2022 年 1 月 27 日 更新
- 掲載していたサンプルを .NET 6.0.1 に置き換えました。
Entity Framework Core を使うと、ほとんど SQL を書かずとも、データベースの作成やデータの更新、取得ができるため、非常に便利だと思います。 今回は Entity Framework Core を業務利用するまでの自分なりの手順を書いていこうと思います。
なお必要な個所はコードを出して解説しますが、全部は解説しきれないため、大幅に省略します。 コード全量については GitHub に置くので適宜参照してください。
- 環境
- プロジェクト(ソリューション)を作成する
- モデルの作成
- NuGet パッケージの追加
- DbContext の作成
- テスト用データベースへの接続設定
- Migration の作成
- データベースの生成
- データアクセスの確認
- まとめ
- サンプルソースについて
環境
- Visual Studio 2022 17.0
- .NET 6.0.1
- Entity Framework Core 6.0.1
dotnet ef が使えない人
本稿では特に解説なく、 dotnet ef コマンドを使います。
dotnet ef コマンドが使えない場合は、以下のコマンドをたたいて、ツールをインストールしましょう。
dotnet tool install --global dotnet-ef
インストール後に再起動しないと使えないこともあります。 詳細は以下のページに解説があります。
dotnet ef のバージョンが古い人
こちらを参照してください。
プロジェクト(ソリューション)を作成する
今回はクリーンアーキテクチャを意識して、プロジェクトを 3 つ、以下の通り作成します。
| プロジェクト名 | 概要 |
|---|---|
| ApplicationCore | ドメイン層に相当するプロジェクト。Entity とかが含まれる。 |
| Infrastructure | DB アクセスの処理を持つプロジェクト。DbContext とかはここに含める。 |
| ConsoleApp | アプリケーション本体のプロジェクト。Web アプリケーションのことが多いが、今回はコンソールアプリケーションで。 |
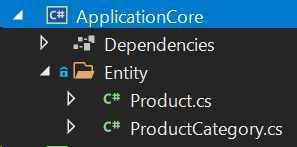
Visual Studio 上のプロジェクト構成は以下の通りです。 すべて .NET 6 をターゲットとして作成しています。 ApplicationCore と Infrastructure のプロジェクトは [Class library] のプロジェクトテンプレートを、 ConsoleApp のプロジェクトは [Console Application] のプロジェクトテンプレートを使用して生成しています。

続いてプロジェクト間の参照を張っていきます。 今回は ApplicationCore が最下層で、それを Infrastructure と ConsoleApp プロジェクトが参照します。 また Infrastructure を ConsoleApp が参照します。 なお今回は、テストプロジェクトの作成を省略します。
モデルの作成
まずはシステムの取り扱うモデルを作成しましょう。 今回はシンプルに、商品と商品カテゴリーをモデル化します。 商品は必ず 1 つの商品カテゴリーを持つ、ということにします。
これを ApplicationCore のプロジェクトに以下のように実装していきます。
コードとしてはこんな感じです。
public class Product
{
    private ProductCategory? productCategory;

    public long ProductId { get; set; }

    public string ProductName { get; set; } = string.Empty;

    public string? ProductDescription { get; set; }

    public decimal? Price { get; set; }

    public long ProcuctCategoryId { get; set; }

    public byte[] RowVersion { get; set; } = Array.Empty<byte>();

    public ProductCategory ProductCategory
    {
        get => this.productCategory ?? throw new InvalidOperationException("Uninitialized property: " + nameof(ProductCategory));
        set => this.productCategory = value;
    }
}

public class ProductCategory
{
    public long ProductCategoryId { get; set; }

    public string Name { get; set; } = string.Empty;

    public byte[] RowVersion { get; set; } = Array.Empty<byte>();

    public IList<Product> Products { get; set; } = new List<Product>();
}
お互いのクラスを相互に参照しあうようなモデルクラスになっています。
NuGet パッケージの追加
続いて Entity Framework Core を利用できるように、 NuGet パッケージを追加していきます。 今回は Infrastructure と ConsoleApp のプロジェクトに以下の通り追加します。
| NuGet パッケージ | Infrastructureプロジェクト | ConsoleAppプロジェクト |
|---|---|---|
| Microsoft.EntityFrameworkCore.SqlServer | 〇 | 〇 |
| Microsoft.EntityFrameworkCore.Design | 〇 | - |
DbContext の作成
DbContext を継承したクラスの定義とコンストラクターを作成する
作成したモデルクラスを使った DbContext を作っていきます。
Infrastructure プロジェクトにクラスを追加して、 DbContext クラスをを継承するようにします。
今回は ProductDbContext という名前を付けてみました。
DbContext を継承したクラスは、以下のようにコンストラクターを 2 つ用意しておきます。
public class ProductDbContext : DbContext
{
    public ProductDbContext()
    {
    }

    public ProductDbContext(DbContextOptions<ProductDbContext> options) : base(options)
    {
    }
}
これは後で DI を利用することを考慮しての実装です。 汎用性を考えると、このような実装としておくことが個人的にはおすすめです。 なお本稿では 2 つ目のコンストラクターは利用しません。
テーブルに対応するプロパティを定義する
続いてモデルクラスをテーブルに対応させるため、 DbContext に DbSet<T> 型のプロパティを以下のように定義します。
public class ProductDbContext : DbContext
{
    // コンストラクターは省略

    public DbSet<Product> Products => this.Set<Product>();

    public DbSet<ProductCategory> ProductCategories => this.Set<ProductCategory>();
}
テーブルの定義
これだけだと、これらのクラスをどのようにテーブルに格納するかが未定義状態になってしまうので、そのあたりの設定を行っていきます。 テーブルの定義は、 'DbContext' クラスの 'OnModelCreating' メソッドをオーバーライドして実施します。
public class ProductDbContext : DbContext
{
    // コンストラクター、プロパティの実装は省略

    protected override void OnModelCreating(ModelBuilder modelBuilder)
    {
        base.OnModelCreating(modelBuilder);
        modelBuilder.Entity<Product>(entity =>
        {
            // テーブル名の設定
            entity.ToTable("Products");

            // 主キーの設定
            entity.HasKey(product => product.ProductId);

            // 各カラムの制約条件、カラム名の設定
            entity.Property(product => product.Price)
                .HasColumnType("decimal(18,0)");
            entity.Property(product => product.ProductName)
                .HasMaxLength(256)
                .IsRequired();
            entity.Property(product => product.ProductDescription)
                .HasMaxLength(1024);

            // 外部キー制約の設定
            entity.HasOne(product => product.ProductCategory)
                .WithMany(productCategory => productCategory.Products)
                .HasForeignKey(product => product.ProcuctCategoryId)
                .OnDelete(DeleteBehavior.ClientSetNull)
                .HasConstraintName("FK_Products_ProductCategories");

            // 行バージョンカラムの設定
            entity.Property(product => product.RowVersion)
                .IsRequired()
                .IsRowVersion()
                .IsConcurrencyToken();

            // マスターデータの登録
            entity.HasData(new Product { ProductId = 1, ProductName = "C#の本", ProcuctCategoryId = 1, Price = 2000 });
            entity.HasData(new Product { ProductId = 2, ProductName = "Visual Studioの本", ProcuctCategoryId = 1, Price = 2200 });
            entity.HasData(new Product { ProductId = 3, ProductName = ".NETの本", ProcuctCategoryId = 1, Price = 2500 });
            entity.HasData(new Product { ProductId = 4, ProductName = "冷蔵庫", ProcuctCategoryId = 2, Price = 150000 });
            entity.HasData(new Product { ProductId = 5, ProductName = "トランプ", ProcuctCategoryId = 3, Price = 280 });
        });

        // ProductCategories の方は省略
    }
}
テスト用データベースへの接続設定
続いてローカル環境での開発と、本番環境での利用、両方を想定してデータベースへの接続設定を行います。
この設定は、 DbContext クラスの OnConfiguring メソッドをオーバーライドして実施します。
この例では、ローカル開発用に SQL Server LocalDB を使用しています。
public class ProductDbContext : DbContext
{
    // コンストラクター、プロパティ、メソッドの実装は省略

    protected override void OnConfiguring(DbContextOptionsBuilder optionsBuilder)
    {
        if (optionsBuilder is null)
        {
            throw new ArgumentNullException(nameof(optionsBuilder));
        }

        if (!optionsBuilder.IsConfigured)
        {
            optionsBuilder.UseSqlServer(@"Server=(localdb)\mssqllocaldb;Database=Products;Integrated Security=True");
        }
    }
}
Migration の作成
次に、データベースにテーブルを作成するための元データとなる、 Migration *1 を作成します。
Migration は、原則として DbContext を継承したクラスがあるプロジェクトに作成します。
今回は Infrastructure プロジェクトに DbContext を継承した ProductDbContext クラスを追加ししていますので、 Migration の追加も Infrastructure プロジェクトに対して行います。
Migration を作成する前に、 Infrastructure プロジェクトをビルドしておきましょう。
ビルドが完了したら、 Visual Studio 内のターミナルから Migration を作成します。 ターミナルについてはこちらを参照してください。
ターミナルで `DbContext' を継承したクラスがあるプロジェクトのルートディレクトリに移動します。 移動したら、以下のコマンドを実行します。
dotnet ef migrations add InitialCreate
InitialCreate の部分は任意の名前を付けることができます。
ただし、何を更新したのかわかりやすい名前を付けておくことをおすすめします。
このコマンドを実行すると、 DbContext を継承したクラスがあるプロジェクトに Migrations ディレクトリが作成されます。
その中には、先ほど命名した Migration が生成されます。

このクラスには、ここまで作成してきたモデルクラスや、 DbContext を継承したクラスの情報から、データベースを初期化したり、初期データを登録したりする処理が記述されています。
データベースの生成
先ほど作成した Migration を利用して、 SQL Server にデータベースを生成します。 Migration を生成したプロジェクトのプロジェクトファイルがあるディレクトリにターミナルで移動し、以下のコマンドを実行します。
dotnet ef database update
このコマンドを実行すると、 SQL Server 上の Migration の履歴データを参照して、生成した Migration を最新の状態まで適用してくれます。 今回は Migration を 1 つしか作成していません。 また、 SQL Server 上にも対応するデータベースが存在しません。 そのため、このコマンドを実行すると、データベースの生成と、作成しておいた Migration の適用が一気に行われます。
正常に処理が行われると、以下のように SQL Server 上に新しいデータベースが作成されます。 またその中には、今回作成した Products テーブルと、 ProductCategories テーブルも生成されています。
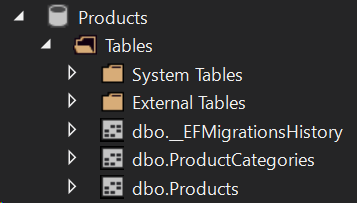
もうひとつ、 __EFMigrationsHistory というテーブルも生成されます。 これが適用した Migration の履歴データを保持するテーブルです。 Entity Framework Core の Migration を利用して SQL Server のデータベース生成を行う場合、このテーブルのデータをいじってはいけません。
データアクセスの確認
最後に、正常にデータアクセスができるか確認していきましょう。 今回はデータアクセス周りの処理を Repository として切り出して、その中でデータアクセス処理を行うように組み立てています。 Repository のインターフェースは以下のようにしてみました。
public interface IProductRepository
{
    IList<ProductCategory> GetAllCategories();
    IList<Product> GetProducts(ProductCategory productCategory);
}
具象クラスは以下の通りです。
public class ProductRepository : IProductRepository
{
    private readonly ProductDbContext context;

    public ProductRepository(ProductDbContext context)
    {
        this.context = context ?? throw new ArgumentNullException(nameof(context));
    }

    public IList<ProductCategory> GetAllCategories()
    {
        return this.context.ProductCategories.ToList();
    }

    public IList<Product> GetProducts(ProductCategory productCategory)
    {
        if (productCategory is null)
        {
            throw new ArgumentNullException(nameof(productCategory));
        }

        return this.context.Products
            .Where(p => p.ProcuctCategoryId == productCategory.ProductCategoryId)
            .ToList();
    }
}
本格的にこれらを使っていく場合は、 DI コンテナーを使用していくところです。
しかし、今回はあくまで Entity Framework Core の使い始めの部分に焦点を当てているため、そういった部分は省略してしまいます。
取り急ぎエントリーポイントの Program.cs クラスから ProductRepository を呼び出して、ちゃんと動いているか確認してみます。
using ProductDbContext context = new();
IProductRepository repository = new ProductRepository(context);

var categoryies = repository.GetAllCategories();
foreach (var category in categoryies)
{
    var products = repository.GetProducts(category);
    Console.WriteLine($"{category.Name}:{products.Count}");
}
結構無駄なことをしてますが、あくまでサンプルということでご理解ください。 これを実行すると、以下のような出力が得られます。
本:3
家電:1
おもちゃ:1

C:\****\net6.0\ConsoleApp.exe (プロセス 6676) は、コード 0 で終了しました。
このウィンドウを閉じるには、任意のキーを押してください...
これで正しく動作していることを確認できました。
まとめ
今回は Entity Framework Core を使って、コードからデータベースの構造を作り出し、データアクセスを行うまでの基本フローを解説しました。 次回は、今回のソリューションを使って、モデルクラスの修正と、データベースへの反映あたりの手順をまとめようと思います。
サンプルソースについて
本稿で解説したソースコード一式は、 GitHub で公開しています。
*1:MS サイトでは「移行」と訳されています